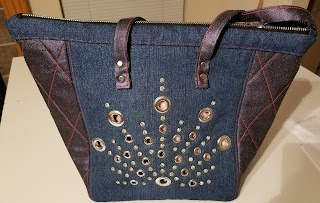
Grommets & Rivets Starburst Bag by Sew4Home Versions 1 and 2
I thought I had already posted my first make of this bag, but evidently not. When I saw this bag on the Sew4Home site I knew I had to make one. The grommets and rivets in the starburst pattern is what captured my attention.
 |
| Version 1 |
 |
| Version 2 |
How I Did It
Again, the rivets and grommets is what did it for me. Version 1 was made as a graduation gift for a friend. The second version I chose to use embroidery as the focal point. When I saw the multi-colored canvas fabric I knew I had the perfect embroidery designs that would go with it - Anita Goodesign's Peruvian Blooms.
On version 2 I had to recut most pieces for the lining because I attached the zipper pocket vertically instead of horizontally. I also improvised for the plastic canvas because I was out. The good thing about it is once I buy some it will be easy to replace with what I made.
- Fabric
- Version 1 - I used denim for the outer and a quilting cotton for the lining.
- Version 2 - I used cork and canvas for the outer and a quilting cotton for the lining.
- Pattern Adjustments
- Version 1
- Instead of regular rivets, I used rhinestone rivets.
- I hand sewed the zipper assembly to the bag.
- I added feet to the bottom of the bag.
- I added interfacing to the lining for more stability.
- Version 2
- On the zipper layout I realized that I did not make a mistake in cutting, but in fact the zipper assembly was too long (about 1/2") so I made the seam allowance 1/2" instead of 1/4".
- I used an embroidery design as the focal point instead of grommets and rivets.
- Because I knew I wanted to carry it as a handbag rather than a tote I also added a zipper pocket and a hook assembly to hold my car key fob.
- I had planned to add a loop to hold my ink pen but I got tired and just wanted it done.
- I added a zipper pull.
- I added feet to the bottom of the bag.
- I added interfacing to the lining for more stability.
- Some Construction Pictures
- Version 1
- Version 2
- Some Finished Pictures
- Version 1
- Version 2
Conclusion
I absolutely love these bags. They are both stylish and unique. The zipper assembly was a nightmare to install for me - both times. My fingers were hurting after installing all the grommets and rivets 😂. Still I will make at least one because because I also want one with the grommets and rivets (the first one was a gift).
What's Next
I have a StyleArc jacket and shirt already cut out waiting to be sewn.


Comments
Post a Comment
Enter comments here