Lekala Blouse 4619
This week during the week I cut out and completed sewing a blouse. I typically sew on the weekend so this was a major feat.
Sewing during the week presents several problems - I don't want to stop and I up staying up way too late. Because I've stayed up too late I am a zombie during the day hours. One day I will learn to sew for 1 or 2 hours and then stop.
Anyway I have a new top now hanging in my closet. It's Lekala 4619 and it was fairly simple to sew.
I made a minor change on the sleeve cuff suggested by a review of this same pattern. I cut it on the bias. I drew a bias grain line on the pattern.
Then I sewed the collar.
Bias cut sleeve bands came next.
Adding the facing was a little difficult only because I did not understand how the back collar facing and front facings were to go together which is why I did the sleeve bands first. I pinned the facing pieces to the blouse and eventually the light bulb came on but it did take awhile.
The instructions had you tacking the collar and facing which means hand sewing. I hate hand sewing and stitched in the ditch to tack the collar and facings.
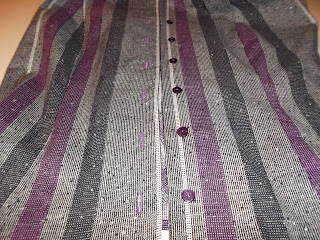
And finally the finishing details - hemming, buttonholes, and buttons.
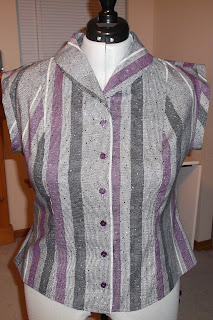
The completed shirt.
I will probably make one more of this blouse before I move on to the next pattern. My next project will be another pair of pants - I think.
Sewing during the week presents several problems - I don't want to stop and I up staying up way too late. Because I've stayed up too late I am a zombie during the day hours. One day I will learn to sew for 1 or 2 hours and then stop.
Anyway I have a new top now hanging in my closet. It's Lekala 4619 and it was fairly simple to sew.
 |
| My Version of Lekala 4619 |
 |
| Lekala 4619 |
How I Did It
Everything came from my stash except the buttons - ya. I have to admit it is getting really hard to go to a fabric store and not buy fabric. This project took about 2 1/2 yds of fabric.
I entered my measurements, downloaded my pattern, and taped it together. It's kind of funny because I used to hate taping the pattern together. Now it has tuned into great anticipation - I can't wait to get it put together so I can cut it out and sew. Did I say no adjustments - no adjustments. I just cut and sew - pure sewing joy.
 |
| Pattern Pieces |
| New Bias Grain Line |
I interfaced the necessary pieces - the front facings and back neck facing.
I sew the front and backs and then sewed them together.
The instructions had you tacking the collar and facing which means hand sewing. I hate hand sewing and stitched in the ditch to tack the collar and facings.
And finally the finishing details - hemming, buttonholes, and buttons.
 |
| Front Bottom of Facing |
The completed shirt.
Conclusion
This was an easy shirt to put together - quick and fairly simple. The collar facing stump me for a minute but I got it completed anyhow. I love the collar and the princess seams which gives me the illusion of a waistline.I will probably make one more of this blouse before I move on to the next pattern. My next project will be another pair of pants - I think.


Great job.
ReplyDeleteThank you
DeleteI love it! Especially, love your fabric choice. Well done.
ReplyDeleteThank you. I've seen your work and it is amazing.
Delete