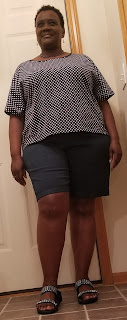
What drew me to this blouse was the sleeve. I thought the sleeve was unique and I thought about how cool I would be on a hot summer day wearing this blouse. These days I want to spend my time sewing - not fitting. I also want to turn out a garment rather quickly. This 3 piece pattern fit the bill perfectly.
For the first version I purchased fabric specifically for this pattern. My problem was the pattern calls for a low stretch knit and I mistakenly bought a super stretchy knit. After making it I was not pleased with the results although it is wearable.
 |
| First Version - Wrong Knit Fabric |
For the second version I used a cotton fabric. I felt much better about this one but still was not totally pleased until I wore it.
 |
| Second Version |
How I Did It
Since I did 2 versions I will focus on what I did for the second one since I was more pleased with it.
I used a very thin cotton print that was in my stash - it was give to me. I did not want to use "good" fabric since I wasn't quite sold on the top. With the second version I decided to make a 1 inch sway back adjustment. I always need this adjustment but I always forget to make it but not this time.
 |
| Back with Sway Back Adjustment |
 |
| Sway Back - New Redrawn Back Neckline |
I stitched the darts and then the right shoulder seam.
 |
| Front Neckline |
 |
| Front Bust Dart |
Next was the neckline. On the second sew of the top I remembered to do stay stitching on the neckline to prevent stretching in the neck area. I cut 1 & 3/4 inch bias strips and sewed them together. I folded it half and attached it to the neckline. On the first version of the top I turned the neck binding so it would show on the outside.
The second version I sew it according to the instructions. On the first version I also graded the seams which made it impossible to remove once I realized the neckline doubled over because it was too loose (or stretched).
 |
| Bias Strips |
 |
| Bias Strips Pieced Together and Press in Half |
 |
| Completed Neckline |
 |
| First Version Neckline |
And finally the sleeve. The instructions had you turn under the edges. I chose to do a serged rolled hem instead.
 |
| Sleeve with Rolled Hem |
 |
| Close up of Rolled Hem |
Conclusion
This pattern had only 3 pieces and was fairly easy to put together. I will admit the first sew of this pattern it took me a while to figure out the sleeve. After I figured it out I made more alignment marks on the sleeve pattern piece to make it easier for future makes.
The first version I use a fabric with too much stretch. It is wearable but it is way too baggy because of the fabric.
The second version I did a sway back adjustment and was pleased with the results. I wasn't pleased with my fabric choice until I wore it - I loved it and it looked good on. I truly expected it to be a throw away.
What's Next
I have no idea I have been changing my mind way too much.


Comments
Post a Comment
Enter comments here