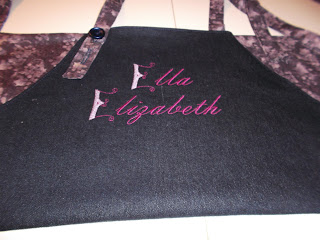
I don't have grandchildren so why did I end up staying up all night making 2 aprons for Me Maw's grand kids - by opening my big mouth.
I had one of the grand daughters in my Sunday School class so after church Me Maw strongly requested I accompany them to Pizza Ranch for dinner so I did. While at dinner I starting suggesting all kinds of things they could do while at Me Maw's (unsolicited suggestions).
One of the things I suggested was baking cookies so of course they had to have aprons and a chef's hat for making cookies. I suggested Me Maw make them while teaching the grand daughters to sew and got the "look". After a bit more discussion and the grand daughters being super excited about the thought of sewing, it became my job.
Their just wasn't enough time to incorporate sewing training into the plan or to make the chef's hat. So I made the aprons and bought fabric paint so they could personalize it and make it their own later.
 |
| Version 1 |
 |
| Version 2 |
How I Did It
I ran to my local fabric store and bought some dark denim fabric and pre-washed it before using. Lately using my stash has just not been working out too well. The backing fabric was a cotton print from my stash though.
I used the instructions from the
Michael Miller Fabrics Blog titled "
Classic Apron Tutorial". This is a reversible apron that is very easy to put together. It took me forever because I turned on the TV and there were good movies on back to back as it always is when I turn on the TV and attempt to sew.
I think the first thing I did was make the neck and waist straps by cutting 4" wide strips by the width of fabric. I folded them in half and then again each half in half. I turned one end down 1/2" and stitched it and left the other end raw. I top stitched on each long edge of the straps.
I changed the neck strap. I shortened it about 10" and added 2 buttonholes rather than "D" rings. I needed to shorten it because I wasn't using the "D" rings. Even with the "D" rings it would have been much longer than a traditional neck strap.
 |
| Close-up of Strap Top Stitching |
 |
| Neck Strap Shortened and Buttonholes Added |
Next I embroidered each child's name. I wanted each name to be different so I used different colors and a different font. The first letter in each name was from
Whimsey Alphabet by Bunnycup and the other letters came from fonts in my embroidery software.
The final step was putting it together. I basted the straps in place, put right sides together, and left a 4" opening on one of the side seams for turning. After turning and pressing I top stitched around all sides using a 12wt Sulky Cotton thread.
Then I added 2 buttonholes to the neck strap and added a button to top right front. I added 2 buttonholes about 1" apart so the strap could be adjusted as needed. There were instructions for a pocket but I chose not to add it.
 |
| Front |
 |
| Other Front |
Conclusion
This apron was simple to construct. The instructions were well written and easy to understand. It should have taken very little time but with the TV on it took forever. The plan was to work with the grand children letting them use the fabric paint to make it their own and to take pictures of the final result but there just wasn't enough time for that to happen.
I finally went to bed about 6:20 am and had to get back up at 8:00 am so I could go to a quilt store with a friend - I had to drive. I did really good because I only bought a couple of items.
 |
| Looking for the Perfect Jumpsuit Pattern |
 |
| Adding to my Quilt Stash |
What's Next
I don't know that it will be next but I am looking for the "perfect" jumpsuit pattern for my newly acquired fabric.


Comments
Post a Comment
Enter comments here