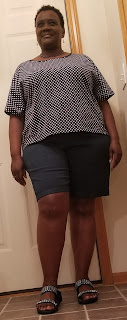
Shorts/Pants Fitting Woes
My word for me this day, week, month, year...... comes from Matthew 11:28 which says "Come to me, all you who are weary and burdened, and I will give you rest."
I went back to the same pattern Butterick B6061 view B and again got frustrated. Wait, I started frustrated just from the thought of having to tackle the adjustments. I almost gave up again but I stuck with it and have a fairly decent pair of shorts to show for it.
Because I knew making the shorts adjustments would tax my patience I decided to sew them without any adjustments just for the pure joy of sewing and completing a garment. I had some ugly fabric that someone had given me and that I did not mind "wasting" so I used it and completed a pair of shorts that I knew would not fit (I could put them on and zip them up but if I bent my body in any direction the seams would surely fail).
How I did It
I took my measurements, made the adjustments, and sewed a muslin. I should have known something was wrong when according to my measurements as compared to the pattern I thought I needed to reduce the hip measurement by about 4".
I tried on the muslin after I had sewed the front and back together and knew something was wrong. The muslin was tighter than the original without any adjustments. I wanted to cry and give up but I hung on.
I re-took my measurements and realized I had made a mistake. I ended up adding 4.5" to the crotch, 3" to the hip, and removing 1" from the waist. I used the book "Pattern Fitting with confidence" by Nancy Zieman to guide me on the adjustments.
I followed the pattern instructions for the most part. My only deviations were made were at the hem and waist. My edges were serged so I did not turn them under. At the waist I "stitched in the ditch" to tack down the waist facing. I also added interfacing to the zipper area for a bit more stability.
 |
| Interfaced Zipper Area |
 |
| Stitch in the Ditch for Waistband Facing |
I used Sulky 30wt Cotton Blendable thread for the top stitching.
 |
| Top Stitching with Sulky Cotton Blendable Thread |
Conclusion
This pattern was quick and easy and the adjustments were pretty easy once I used the correct measurements. The shorts are comfortable and they fit pretty good but I still need to "tweak" the adjustments and I will do it on the next pair that I make.
 |
| Wrong Side Frong |
 |
| Wrong Side Back |
 |
| Right Side Front |
 |
| Right Side Back |


Comments
Post a Comment
Enter comments here