I love other people's creativity because I get to copy it and make it my own.
After I learned the difference between quilt cotton and good quality quilt cotton I have been buying good quality quilt cotton. I have a couple of local quilt shops that carry really good fabric (not all quilt stores are created equal).
You typically pay more for quality fabric so I don't throw scraps away unless they are teeny tiny pieces. As you can imagine I have collected quite the stash of scraps. Thank you "the crafty quilter" for giving me a project that helps me to use up my scraps.
The month has been super busy for me and I haven't had time to devote to sewing so I have been having sewing withdrawal pains. I started these mug rugs sometime ago and since I had limited sewing time I decided to finish them.
 |
| Mug Rug |
How I Did It
I got this project from
the crafty quilter. The link takes you the Orange Peel Mug Rug project which has the instructions and pattern.
You cut and sew eight 1 7/8" squares together and then attached it to a 6" square. I am a lazy sewer that avoids hand sewing with little time to sew. So instead of adding "orange slice" applique pieces I chose to embroider.
 |
| Front of Mug Rug with Embroidery |
For the inside I chose to use 1 piece of Insul-Bright and 1 piece of cotton batting.
 |
| Insul-Bright and Cotton Batting |
Remember I said there was a time I did not know the difference between regular quilt cotton and good quality quilt cotton? Well, this is a project where you and mix some of the "bad" stuff in with the good. I bought a lot of "bad" fat quarters and have a few left that I use on "appropriate" projects.
I used some of the bad stuff for the backing. I cut the fat quarter into 4 somewhat equal pieces to use for the back. I cut it down to the right size before adding the binding.
 |
| Back of Mug Rugs |
I stitch in the ditch on the small squares which was a waste of thread since I ended up stippling on the small squares side (left side).
 |
| Stippling Added to Left Side (Small Squares) |
The backing fabric wasn't wide enough on all four mug rugs to do a self facing so I used jelly roll strips to add binding for the finish edges.
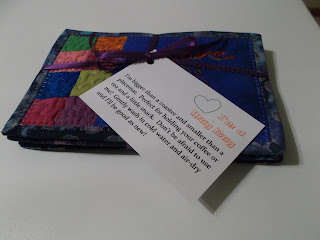
I made a tag with instructions for the mug rug following the project instructions. Today as I was looking for the URL for the project instructions I also found a pdf with the mug rug tags already done - I would only need to print them out. Her tag looks much better than mine. I will use hers the next time.
Why a tag? Most people have no idea what a mug rug is.
 |
| Mug Rugs with Instructions |
 |
| Front Closeup |
 |
| Back Closeup |
Conclusion
When I started this project I had no particular person in mind. After I made them I thought about my co-worker. She just had to move her mom to a permanent care facility. After thinking about her I asked her could I give these to her mom to help make her room more "homey". She thought it was a wonderful idea so I "packaged" them up and gave them to her.
What's Next
I have been trying to finish a shorts jumpsuit which it is not going so well and a hand painted skirt which is stalled at the painting process. I need to start on my winter wardrobe so I have no idea what will come next.


Comments
Post a Comment
Enter comments here