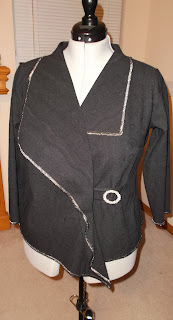
A Little Sparkle
 |
| Lekala 4650 |
No way was I trashing this project - I had purchased this beautiful fabric from Marcy Tilton. I let it sit on the dress form for a couple weeks. I finally figured out how to get it to a point where I would be somewhat satisfied.
 |
| Lekala 4650 |
How I Did It
I ordered my fabric online since I have become totally frustrated with what my local fabric store has to offer. It is a black jacquard cotton with an abstract woven pattern. I was able to get it on sale for $12 per yard. I even have enough left to make a skirt or possibly pants.I wanted something to sew that was easy and quick and this pattern fit the bill. It was a 6 piece pattern and the construction was a breeze.
I added the darts to the front panel and then moved on to the belt. I did not notice this pattern until I saw it reviewed on Pattern Review. I loved what treefrog did with her jacket and took my inspirations and hints from her.
I found a beautiful belt buckle with some bling at Hobby Lobby and it was on sale too. After I attached the buckle I stitched it onto the jacket left front.
Next I attached the collar. I will admit I got stuck on the collar construction but I had made a jacket with a similar collar and looked at it for help. A french seem would have been better here but I only had 1/4 inch seam to work with. It is covered when the collar is folded so it works.
 |
| Collar |
I made a bias loop out of my fabric to use for looping around the belt buckle.
 |
| Bias Belt Loop |
A few years ago (ok more than a few) I bought the Madeira Overlock Inspiration Box and it has some beautiful thick thread that are already color coordinated. Since the jacket was black I wanted to brighten it up a bit. I used a combination of black and silver metallic like threads to go with the belt buckle and serged the edges.
 |
| Serged Edges |
As mentioned earlier I had to let it sit and think about how to make my fabric work. I ended up adding a snap and tacking down the front right side across from the buckle to make it stay in place. Again, had I used a knit fabric this would not have been an issue.
The back had no definition or shaping and I did not like it. Since I am round I wanted/needed the illusion of shaping so I added 2 darts in the back.
I had to play around with the placement and shaping of the darts before I settled on the final placement/shape. I would pin the darts in place and check the look. I ended up spacing them evenly about 3 inches away from the center back and came down from the top edge about 6 inches.
The picture below show the faint tracings of the different darts before I choose the final one. I made a 1 inch sway back adjustment (before cutting the fabric).
 |
| Back Dart |
 |
| Stitched Back Dart |
More pictures.
Conclusion
I really wish I understood photography and lighting better because my pictures don't really capture the beauty of this fabric - maybe one day I will get there.
After I finished the edging I realized I had my stitch length to tight which caused a ripple effect around the neck edging - now I call it a design feature (mistake turned intended whoopsie).
The jacket looks much better on me but my selfies are horrible. I really love this jacket and I love, love, love the bit of bling.


Comments
Post a Comment
Enter comments here