Sweatshirt Transformations
I have a friend who has a son in preschool that wanted a gift for his teachers. After a bit of discussion we decided on sweatshirts. Why? Most people like them and are soooooo easy to transform.
Because they are teachers I knew the perfect embroidery to add - it was a couple of designs from the Dear Teacher set at Bunnycup Embroidery. I had her go to the site and choose the designs she wanted. The plan was to make 2 of the same except different color, embroidery, and name. The first one took too much time so I made the second version because I knew it would be much easier transform.
I found the center of the sweatshirt, cut it down the front middle, and added more knit stay tape.
Now it was time to add the embroidery design from Bunnycup and a name. I believe I came down about 6" from the neck edge. During the embroidery I "floated" an additional piece of embroidery stabilizer at a 45 degree angle under the hoop.
I cut 4 strips of denim, pressed under one raw edge, and stitched them to the center front. I did essentially the same for the bottom of the sweatshirt and the collar. I forgot to take a picture of the collar construction. The collar was stitched ontop of the collar ribbing.
For the sleeves I cut a few inches slit and added the cuff in much the same way as the front and bottom bands. I just realized I don't have picture of the cuff construction.
The final details included back tabs, top stitching, and buttonholes. I used either a Sulky 12wt or 30wt cotton blendable thread in both the top and bobbin.
Inside of the sweatshirt was a rather large manufacturer's label and I contemplated just leaving it be but because it was so big and it was going to be given as a gift I needed a solution for covering it. The easiest thing to cover it was to create a label but stitching it in wasn't an option so I used heavy heatbond to attached the label to the sweatshirts.
I don't include labels in the things I make and since I did not have any I had to make up one. I chose to embroider my blog name on some scrap quilting cotton to create one.
Originally this was supposed to be a replica of version 1 but I changed my mind after I saw how long it took me to finish the first version.
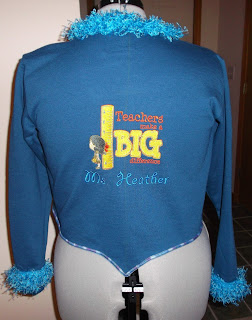
I used a plate to create the curved shape and brought the drawn lines to a point in the center back and added knit stay tape to the edges.
To finish the edges I used a wide serger stitch and cotton thread from the Madeira Overlock Inspiration Box.
It took a minute but I finally finished them both.
I also expected to have my coat made by now (Lekala 4383) but the fabric I have fallen in love with is crazy expensive and no other fabric is acceptable to me right now. I don't see a coat in my near future.
 |
| Version 2 |
 |
| Version 1 |
How I Did It
I started with 2 fleece crewneck sweatshirts. The books that I used as inspiration were Sewing with Nancy's "Sweatshirt Jean Jackets" for version 1 and Lorine Mason's "Fashion Sweatshirts" for version 2.Version 1
I removed the bottom ribbing and an additional inch from the bottom and added knit stay tape.I found the center of the sweatshirt, cut it down the front middle, and added more knit stay tape.
Now it was time to add the embroidery design from Bunnycup and a name. I believe I came down about 6" from the neck edge. During the embroidery I "floated" an additional piece of embroidery stabilizer at a 45 degree angle under the hoop.
I cut 4 strips of denim, pressed under one raw edge, and stitched them to the center front. I did essentially the same for the bottom of the sweatshirt and the collar. I forgot to take a picture of the collar construction. The collar was stitched ontop of the collar ribbing.
 |
For the sleeves I cut a few inches slit and added the cuff in much the same way as the front and bottom bands. I just realized I don't have picture of the cuff construction.
The final details included back tabs, top stitching, and buttonholes. I used either a Sulky 12wt or 30wt cotton blendable thread in both the top and bobbin.
Inside of the sweatshirt was a rather large manufacturer's label and I contemplated just leaving it be but because it was so big and it was going to be given as a gift I needed a solution for covering it. The easiest thing to cover it was to create a label but stitching it in wasn't an option so I used heavy heatbond to attached the label to the sweatshirts.
I don't include labels in the things I make and since I did not have any I had to make up one. I chose to embroider my blog name on some scrap quilting cotton to create one.
Version 2
Originally this was supposed to be a replica of version 1 but I changed my mind after I saw how long it took me to finish the first version.
I used a plate to create the curved shape and brought the drawn lines to a point in the center back and added knit stay tape to the edges.
To finish the edges I used a wide serger stitch and cotton thread from the Madeira Overlock Inspiration Box.
It took a minute but I finally finished them both.
Conclusion
These transformations are quick and easy (I'm a slow sewer) and make great gifts. I think my favorite is version 2. The sweatshirts were too small to fit on my dress form for decent pictures.What's Next
I wanted to make pants from Lekala 4692 and I did but there is something off about the pattern and it has to do with the crotch length and the leg length. I am still trying to decide if it should be tossed or if it is savable. I have put it away for now.I also expected to have my coat made by now (Lekala 4383) but the fabric I have fallen in love with is crazy expensive and no other fabric is acceptable to me right now. I don't see a coat in my near future.


Comments
Post a Comment
Enter comments here