Two in a row - 2 memory quilts that is.
Each year we open our evangelistic season by celebrating Founder's Day with the Church House of Prayer (CHOP) in Oklahoma. Last year a fellow church member suggested we create a memory quilt for presentation this year.
I forgot about it until about a month ago when I was doing the previous memory quilt. I requested pictures and after 2 weeks I figured I would not get them until after we arrived in Oklahoma. Six days before I was to leave for Oklahoma I got the pictures. I should have said I would get it done after we got back but I didn't.
It was 6 days of insane stress but by God's grace I got it done.
How I Did It
I am happy to say everything came from my stash - ya. I was determined not to buy anything for this project. Except for Sunday all work was done starting in the evening after I got off work.
Day 1 (Sunday)
- I got the pictures that afternoon but did not have time to do much.
- I prepared my fabric for printing the pictures by cutting my fabric into 8.5" x 11" pieces and soaking them in Bubble Jet Set 2000. I allowed the pieces to dry for 24 hours.
Day 2 (Monday)
- I reviewed all pictures and decided which ones I would use for the memorial.
Day 3 (Tuesday)
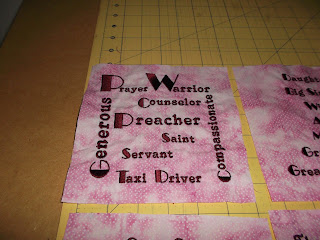
- I reviewed information I received with pictures and decided on the sayings and words I would embroider. I created the embroidery in my Hatch embroidery software.
Day 4 (Wednesday)
- I cut squares about 8" knowing that I would trim them down to a 6.5" square. Next I stitched out the designs and cut the 8" square down to 6.5"
 |
| Her Essence |
 |
| Her Relationships |
 |
| Her Favorite Scripture |
 |
| Sayings She was Known for |
Day 5 (Thursday)
- I printed my pictures by ironing my prepared 8.5" x 11" pieces onto a piece a ink jet printable freezer paper. I used Word to place and print my pictures.
- I cut out the individual pictures and applied Heat Bond to the back of each picture.
- I cut squares of fabric about 8" and pressed the individual pictures onto the squares. Then I used a decorative stitch to cover any printed cut lines and "white" space.
- I cut the squares down to 6.5" and afterwards I cut and added a 1 1/2" border around each square with the finished border being 1".
 |
| Fabric Prepped for Printing |
 |
| Prepped Fabric Ironed onto Freezer Paper |
Day 6/7 (Friday & Saturday)
- I decided the 1 1/2" border would make the memorial too big. I knew my church was going to have it framed and the bigger the memorial the higher the cost of framing. I decided a 1/2" finished border was better so I cut the "picture" border down so the finished border would be 1/2".
- I cut and added 1/2" frame around the "word" squares.
- I stitched the rows together.
- Then I remembered I had more embroidery to do. I believe I cut 3 1/2" horizontal strips and 2" vertical strips. I embroidered on the 3 1/2" strips and added all the strips to the memorial to create a final border.
- I cut batting and backing for the memorial and stitched in the ditch with a Sulky 30wt Cotton Blendable thread. I forgot to take a picture of the back.
- I cut 2 1/2" strips for the binding and attached the binding. I stitched in the ditch using a decorative stitch and a Sulky 30wt Cotton Blendable thread.
- Why put Day 6 and 7 together? Because I did not sleep between these days. I started Friday evening after work. Friday turned into Saturday and I honestly did not think I would finish it. Because I was suffering from sleep deprivation things that I do all the time in a small amount of time took about 4 times as long to do. I had about 40 minutes after completing the memorial to bathe, get dress, and pack before I had to leave.
Conclusion
This project was brutal only because of my lack of time. Saturday morning I was completely exhausted and just about in tears because I too tired to figure things out.
Understand quilting type projects are something I do quite often but because I was exhausted things just kept going wrong and took much longer than normal complete. I wasn't able to fix minor errors but most people either don't notice them or they just ignore them.
What's Next
I thought I had completed the robe (view A) for McCalls 6659 but as I was getting a picture of the pattern envelope I realized something did not look right on my robe. I reviewed the instructions and learned I had done something wrong. Now it makes since why I was having such a hard time with the facing band. I will fix the error and post it.
My other project waiting in the queue is Lekala 4748.
 |
| Lekala 4748 |


Comments
Post a Comment
Enter comments here