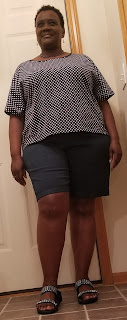
My Frankie Baseball T-Shirt
Today was supposed to be a satisfying sewing day - NOT. I have a shirt already cut out but the fabric will be a pain and I wanted something easy today so I decided on a dress and assembled the pattern (quick and easy assemble method).
The pattern is designed for a knit but when I put the pattern up to my body I was concerned that it would not fit properly even with a knit fabric. Since this was supposed to be a custom fit pattern I was aggravated that it didn't appear to fit. I decided to cut a muslin before cutting into my fabric before I realized I did not have enough fabric for a muslin - more aggravation.
I recently bought the book Tilly and the Buttons Stretch! and decided to use one of its patterns. I chose the Frankie Baseball T-Shirt pattern included with the book. I was so desperate to sew something "quick and easy" that I didn't even care if the shirt fit.
The pattern called for a single knit jersey and my fabric is some kind of cotton jersey blend. I think a bamboo knit would have worked much better because it has a little bit more weight to it.
I shortened the bodice and sleeves by 3" but on this pattern 2" would have been fine. Because of the raglan sleeve I did not know how to do my normal sway back adjustment and was too lazy to look for it on the internet.
To help ensure my success with knits, this time I attached a walking foot to my machine. I also basted the seams first before serging them.
I started by stitching the front to the sleeves then to the back and pressed the seam allowances toward the sleeve.
Next was the collar and this is where I usually have problems. I typically stretch the neckline out of shape. I seriously thought I could add 4 pins and sew the neckband successfully. I ended up having to rip the seam and start over again using a lot more pins.
After attaching the neck band I pressed the seam towards the bodice and added a zig zag around the neckline to keep it in place.
Next I stitched the sides. Then I serged the edge of both the bodice and sleeves. I used the serged edge as a guide to do a double turn for the hems.
More pictures.
The pattern is designed for a knit but when I put the pattern up to my body I was concerned that it would not fit properly even with a knit fabric. Since this was supposed to be a custom fit pattern I was aggravated that it didn't appear to fit. I decided to cut a muslin before cutting into my fabric before I realized I did not have enough fabric for a muslin - more aggravation.
I recently bought the book Tilly and the Buttons Stretch! and decided to use one of its patterns. I chose the Frankie Baseball T-Shirt pattern included with the book. I was so desperate to sew something "quick and easy" that I didn't even care if the shirt fit.
 |
| Frankie Baseball T-Shirt |
How I Did It
I was desperate to sew something quick and easy not caring if it would fit. I had some fabric in my stash that I had ordered from an online company and have been less than please with it so I decided to use that fabric. I had already made up my mind that I would give the shirt to someone who could fit it.The pattern called for a single knit jersey and my fabric is some kind of cotton jersey blend. I think a bamboo knit would have worked much better because it has a little bit more weight to it.
I shortened the bodice and sleeves by 3" but on this pattern 2" would have been fine. Because of the raglan sleeve I did not know how to do my normal sway back adjustment and was too lazy to look for it on the internet.
To help ensure my success with knits, this time I attached a walking foot to my machine. I also basted the seams first before serging them.
I started by stitching the front to the sleeves then to the back and pressed the seam allowances toward the sleeve.
Next was the collar and this is where I usually have problems. I typically stretch the neckline out of shape. I seriously thought I could add 4 pins and sew the neckband successfully. I ended up having to rip the seam and start over again using a lot more pins.
After attaching the neck band I pressed the seam towards the bodice and added a zig zag around the neckline to keep it in place.
Next I stitched the sides. Then I serged the edge of both the bodice and sleeves. I used the serged edge as a guide to do a double turn for the hems.
More pictures.


Comments
Post a Comment
Enter comments here