Megan Nielsen - Opal
I am sooooo excited because I got an opportunity to test the new Opal pattern from Megan Nielsen. Sometime ago I signed up to be put on their list of testers and I am so glad I did. A number of weeks ago I got the email asking if I wanted to test a new pattern - of course the answer was a resounding yes.
I was immediately drawn to the paperbag waistline option. I had some reservations about how it would look on me but I decided I would try it anyway.
The pattern's size range is 14 - 30 (they have love for the big girl!) and I chose a size 22 and graded up to a 24 in the hip.
These are normally the pattern adjustments I have to make.
I also graded the pocket from a 22 to 24 at the hip.
Here are pictures of some construction steps.
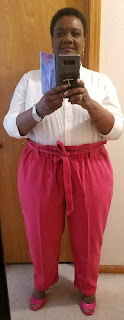
This pattern has a generous amount of ease which I absolutely love, but trying to take pictures and not having the pants look wonky was hard. I even had a friend help me by taking some of them. I found the pants showed the best for pictures if I opened my legs. I don't like the pose but I wanted to show how the pants really look.
I struggled with the decision to make the paperbag waistband because I knew I already had a sizable waistline and I questioned if it would be a good look on me. I am actually pleased with how it looks and am glad I took the risk.
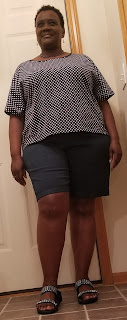
I do plan to make more pairs of the pants and I also want to make the longer shorts.
I bought a Megan Nielsen pattern last summer I believeand still have not touched the pattern so this is my first experience with this pattern maker and it definitely won't be my last. I love that this pattern maker includes my size which translates into a few modifications and more time for sewing rather than a lot of time spent on pattern adjustments.
I can now wholeheartedly support this pattern maker because they include me in their size range and they make stylish and awesome fitting patterns.
I was immediately drawn to the paperbag waistline option. I had some reservations about how it would look on me but I decided I would try it anyway.
How I Did It
I had 3 yards 44/45" of a fabric that has been in my stash for a long time. It is a hot pink microfiber or a microsuede (100% polyester) I believe. Within the last few years when I buy fabric I wash it before I put it in my stash, however, this fabric was bought before I started that. I now have a hot pink sewing machine 😠 so if there is any question in the future I will pre-wash it first.The pattern's size range is 14 - 30 (they have love for the big girl!) and I chose a size 22 and graded up to a 24 in the hip.
These are normally the pattern adjustments I have to make.
- Shorten the length 3" - I spread the adjustment out (I didn't use my normal Nancy Zieman method from the book Pattern Fitting With Confidence).
 |
| Shorten the Length 3 Inches |
- Increase the hip width - It was really easy to make this adjustment. I just graded from a size 22 to a size 24 at the hip.
 |
| Graded from 22 to 24 at the Hip |
- Lower the front rise - I have a tilted waist line (higher in the back and lower in the front). I lowered the front rise 1". What I have learned to do by trial and error is to first outline the original waistline and lay it on top to make my adjustment so I keep the original shape of the waistline.
 |
| Lower the Front Rise 1" |
 |
| Adjustment Folded to the Back |
- Raise the back rise 1" - OMG I did this modification on the side rather than at the back and did not realize the mistake right away. I thought it was strange that I had to modify the pocket to fit the back (that should have been a huge clue that something was wrong). I made the adjustment to the pocket, stitched it to the back, stitch the front and back pockets together, did the under stitching and only then did I realize the pocket did not lay flat and knew something was wrong. It took me a minute to realize that I had raised the side rather than the back rise. I did not have enough fabric left to re-cut the back so I cut off the adjustment which meant I did not raise the back rise. The pictures below show the adjustment on the wrong side.
 |
| Modification Made to the Wrong Side (I removed it) |
I also graded the pocket from a 22 to 24 at the hip.
Here are pictures of some construction steps.
This pattern has a generous amount of ease which I absolutely love, but trying to take pictures and not having the pants look wonky was hard. I even had a friend help me by taking some of them. I found the pants showed the best for pictures if I opened my legs. I don't like the pose but I wanted to show how the pants really look.
Conclusion
I am in truly in love with this pattern. I cannot adequately explain how comfortable these pants are. The instructions are so detailed and it made it easy to sew.I struggled with the decision to make the paperbag waistband because I knew I already had a sizable waistline and I questioned if it would be a good look on me. I am actually pleased with how it looks and am glad I took the risk.
I do plan to make more pairs of the pants and I also want to make the longer shorts.
I bought a Megan Nielsen pattern last summer I believe
I can now wholeheartedly support this pattern maker because they include me in their size range and they make stylish and awesome fitting patterns.


Comments
Post a Comment
Enter comments here